Further Reading
For more on using the Node REPL, take a look at these articles from TechVidvan and CodeDamn.
There are several ways to begin exploring JavaScript.
You can create simple “sandbox” websites to run your JavaScript code and then print to the Dev Tool’s console. Or, if you don’t need any DOM elements, you can just create a plain JS file and use node --watch to see what happens as you code. Alternatively, if you don’t need a web page’s DOM, you can run and watch a JavaScript file directly within a terminal using the node --watch [filename] command.
There’s another approach if you just want to focus on one-off experiments with JavaScript. You can use REPLs such as the browser’s Developer Tools Console or the Node REPL within a terminal window.
node --watchThis approach is really handy if you want to focus on just JavaScript without the distraction of having to build or use a web page with a fully-available DOM. In fact, it’s the way I start my QuickStart tutorials for beginner programmers. Exploring JavaScript without having to think about HTML and CSS is very instructive. I like it because it de-clutters the landscape, keeping things simple.
Use Node to watch your *.js script if you want to test-drive working code, particularly when it comes to wrestling with logic and problem solving.
Launch Visual Studio Code (VS Code). From the menubar, select File -> Open Folder… and create an empty folder for this quickstart. You can name the folder anything you want, but if you want a suggestion, call it JS-Quickstart.
Open a separate terminal by pressing Ctrl + Shift + c. Because you did this from within VS Code, the path in the terminal should match the folder you’ve just opened.
Position the terminal and VS Code side-by-side, so that you can observe what happens as you continue this tutorial.
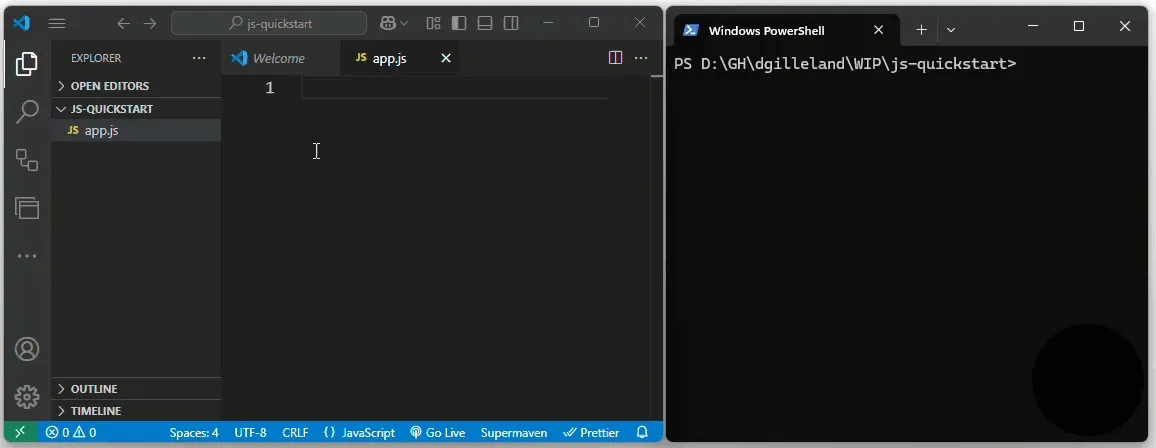
In VS Code, choose File -> New File… and name it app.js. Save it in the folder you’ve just created. This is a JavaScript file, as noted by the file extension .js.
Type the following code in the file.
console.log('Hello World!');Switch to the terminal, and run the following command. This will run your app.js file in Node and re-run it every time we save changes.
node --watch app.jsYou should see the message “Hello World” in the terminal.
Do you want to practice the process of using node --watch? Expand the following section and type in more code for the app.js file.
app.js// app.js// - [x] Console outputconsole.log('app.js loaded');console.log(); // empty line
// - [x] The Node process objectconsole.log('NodeJS Version:', process.version);console.log('OS Platform:', process.platform, process.arch);console.log('Computer name:', process.env.COMPUTERNAME);console.log('Username:', process.env.USERNAME);console.log('Working directory:', process.cwd());// console.table(process.argv);console.log();
// - [x] Variable declaration vs. initialization// - [x] Literal numberslet quantity = 10;let price = 5.95;let message;
// - [x] Assignment statement// - [x] Literal stringsmessage = 'The following is a series of demos...';console.log(message);
// - [x] Template strings and placeholdersmessage = `The price is ${price} and the quantity is ${quantity}`;console.log(message);
// - [x] Data Typesconsole.log(`quantity is a ${typeof quantity}`);console.log(`message is a ${typeof message}`);
// - [x] Arithmetic operators for numberslet total = quantity * price;// - [x] Arithmetic operators for strings (string concatenation)message = 'The amount is $ ' + total;console.log(message);
// - [x] Type Conversion// - [x] number to stringlet amount = total.toFixed(2);console.log(`The amount is $ ${amount}.`);
// - [x] Escape charactersmessage = '\n\tSimple Sequence:';console.log(message);// - [x] Simple sequence// Each line is an instruction// They are executed in-orderquantity = 20;message = `Changing quantity to ${quantity} does not cause previous calculations to re-calculate.\nTotal is still ${total} and amount is still ${amount}.`;console.log(message);console.log();
// - [x] Math operationslet adjacent = 4;let opposite = 3;let hypotenuse = Math.sqrt(adjacent**2 + opposite**2);message = `My triangle has sides of length ${adjacent}, ${opposite} and ${hypotenuse}.`;console.log(message);
// - [x] Rounding Errorslet floating = 0.1 + 0.1 + 0.1; // What's the answer?console.log(`0.1 + 0.1 + 0.1 = ${floating}`);console.log(`I can round with the Math library: floating should be ${Math.round(floating * 10) / 10}`);
// - [x] Declaring functionsfunction roundToDecimals(num, decimals) { let factor = Math.pow(10, decimals); return Math.round(num * factor) / factor;}
// -[x] Calling functionslet num = 3.14159;let rounded = roundToDecimals(num, 2); // 3.14console.log(`${num} rounded to two decimals: ${rounded}`);console.log(`${Math.PI} rounded to seven decimals: ${roundToDecimals(Math.PI, 7)}`);The term REPL is an acronym for Read-Eval-Print-Loop. It refers to an environment where you can write code that gets executed immediately upon pressing Enter. REPLs are not considered production environments. Rather, they are “sandbox” environments where developers can explore and play with the language. REPLs will process expressions as well as complete statements in JavaScript.

As such, REPLs are great for learning small, targeted aspects of a programming languge. This is particularly helpful when you are new to the language.
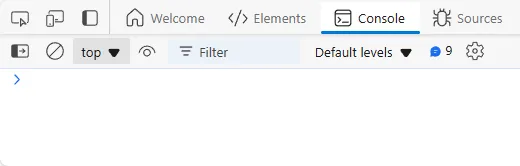
In the world of JavaScript, the Console tab in the browser’s Developer Tools is the most common REPL. Besides being able to write JavaScript, you can explore its use with regard to any web page content (which is why we typically need/want JavaScript code).
Another REPL environment is the Node CLI. Node is a JavaScript run-time environment (suitable for production use), but when you type node by itself in a terminal window, you enter a REPL session where you can explore JavaScript free from any browser. The advantage with a Node REPL is a distraction-free JavaScript playground where you can focus on the language itself.
Which do you choose? Either one works well. If you need to play with the DOM, then the browser’s Dev Tools is the way to go. If you want to just have a JavaScript-only experience, Node is a good choice.
Here’s how you can access your browser’s Developer Tools.
In the Edge, Chrome and Firefox browsers, you can toggle the developer tools by pressing the F12 key.
You can choose where to dock the dev tools by clicking on the elipsis (&ellip;) on the toolbar.

Click on the “Console” tab. This will give you a dedicated REPL with which to perform live edits of your page using JavaScript.
To view the actual script file(s) the browser has loaded, click on the “Sources” tab. Find and click on your JavaScript file from the navigator portion to see the source code for that file.
Within the Sources tab, you can set breakpoints to control execution of your code and then step through each line as part of your debugging efforts.
Pressing the Esc key while in the Sources tab will toggle a Console REPL just below the source code.
Many of the major browsers share the same underlying engine (Chromium), so your experience with the developer tools in each will be mostly identical.
Microsoft has extensive documentation on the DevTools in Edge (my own preferred browser these days - circa 2023).
Edge DevToolsI quickly switched to Google Chrome back in 2008 largely because of the comic book. It’s definitely worth the read, especially once you get into “real world” software development.
Chrome DevTools Comic bookNot too long after Chrome’s first release, Microsoft and Firefox both switched to using the same underlying engine: Chromium.
Firefox DevToolsEntering the Node REPL is fairly straight forward.
node to enter the Node REPL..help for a list of the REPL commands, such as saving and loading external script files..exit in the REPL when you want to return to your terminal context.Further Reading
For more on using the Node REPL, take a look at these articles from TechVidvan and CodeDamn.
One of the distinguishing aspects of writing actual JavaScript files for a web page is that your code needs to contain complete statements. This is different from a REPL environment because the REPL will process partial as well as complete statements. The REPL also automatically gives you feedback on the result of what you are typing. This is different from the “real world” of JavaScript where you have to decide what (if anything) is worth displaying on the web page.
Here’s some resources you can use for a stand-along web page to act as a “sandbox” for exploring JavaScript. You can also find this sandbox as part of the related tutorial that introduces some basic JavaScript concepts.
We’ll use a simple HTML/CSS setup for our sandbox. The whole purpose of this web page is to act as a place where we can see the effect of our code (without relying on logging information to the Developer Tool’s Console).
When our page loads, it will look like this. BTW, I’m basing it on PicoCSS for the base styles and light/dark themes along with Tailwind CSS for custom styles.
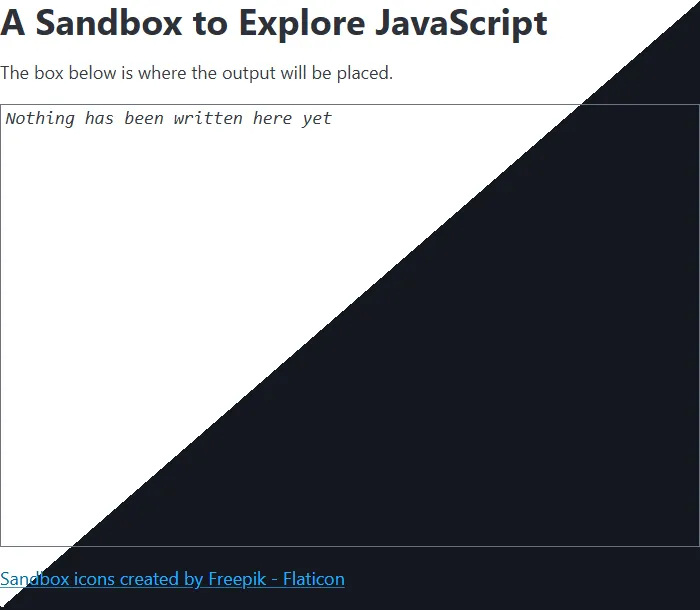
Notice that we have a big “box” area with the text “Nothing has been written here yet”. We’ll be using this as the target for our JavaScript output.
Use the tabs above to get the code and other assets for the Sandbox Starter Kit. Arrange them in this file/folder structure.
Copy this code and save as index.html.
<!DOCTYPE html><html lang="en"><head> <meta charset="UTF-8"> <meta name="viewport" content="width=device-width, initial-scale=1.0"> <title>JavaScript Sandbox</title> <link rel="shortcut icon" href="./img/sandbox-color.webp" type="image/x-icon"> <link rel="stylesheet" href="https://cdn.jsdelivr.net/npm/@picocss/pico@2/css/pico.min.css"> <script src="https://unpkg.com/@tailwindcss/browser@4"></script> <link rel="stylesheet" href="css/styles.css"> <script src="js/main.js" defer></script></head><body class="container h-screen max-h-screen flex flex-col"> <h1>A Sandbox to Explore JavaScript</h1> <p>The box below is where the output will be placed.</p> <output id="sandbox" class="flex-grow w-full overflow-auto block border border-gray-500 custom-inset font-mono px-1 my-2"><em>Nothing has been written here yet</em></output> <footer class="mt-auto"> <a href="https://www.flaticon.com/free-icons/sandbox" title="sandbox icons">Sandbox favicon created by Freepik - Flaticon</a> </footer></body></html>Copy this code and save as css/styles.css.
.custom-outset { border-style: inset;}Copy this code and save as js/main.js.
console.log('main.js has been loaded');const sandbox = document.querySelector('output#sandbox');
// TODO: Use the space below for playing with JavaScript.
Right-click this image and choose “Save Image As…”, making sure to name it sandbox-color.webp. We’re using it as a favicon - the icon that appears in the browser’s tab beside the title of the page.